Что означает CHA FAN на материнской плате – назначение разъёма
Материнские платы в наши дни бывают всех форм и размеров. Форм-факторы, чипсеты, слоты… И ещё: всевозможные разъёмы.
Что ж, многие спрашивают нас о разъеме вентилятора материнской платы, который помечен как «CHA FAN».
Что же такое CHA FAN и для чего он используется?
Что такое CHA FAN
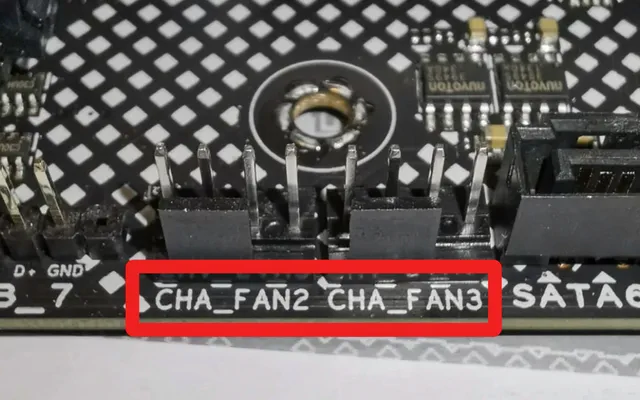
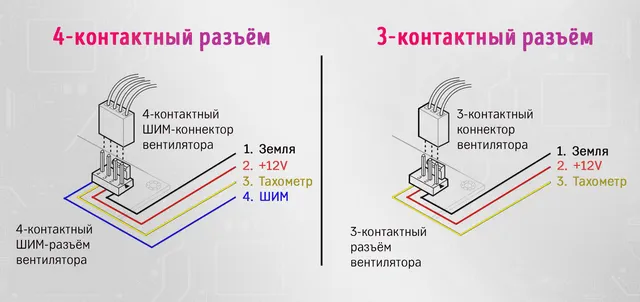
CHA FAN расшифровывается как chassis fan и используется для питания дополнительных вентиляторов в вашей системе через 4-контактный или 3-контактный разъём.
Шасси – это другое слово для определения «корпуса для ПК», и поэтому разъём CHA FAN, в основном, используется для питания и управления дополнительными вентиляторами корпуса ПК.

В зависимости от используемой материнской платы у вас будет от одного до шести разъёмов CHA FAN наряду с CPU FAN и, возможно, CPU OPT.
- 3-контактные разъёмы CHA FAN не имеют возможности точно регулировать обороты. Обычно они работают на максимальной скорости, хотя можно немного снизить её, понизив напряжение.
- 4-контактные разъёмы CHA FAN предлагают широтно-импульсную модуляцию на четвёртом проводе, что позволяет напрямую контролировать скорость вращения.

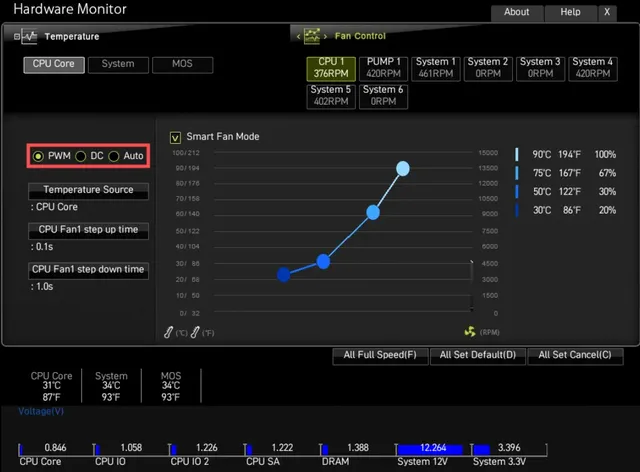
Скорость вращения можно контролировать через BIOS, специальное программное обеспечение или операционную систему. Корректировки основаны на данных о внутренней температуре, будь то средняя температура системы или температура процессора.
На изображении ниже вы можете увидеть, как можно управлять отдельными вентиляторами, регулируя кривую их вращения и выбирая датчик температуры источника.
В этом MSI BIOS разъём CHA_FAN1 будет управляться через вкладку «System 1», разъём CHA_FAN2 через «System 2» и т.д., в зависимости от того, к чему подключены вентиляторы вашего корпуса.
Некоторые производители материнских плат используют заголовок «SYS_FAN» вместо CHA_FAN, но, по сути, это одно и то же.

Какие ещё существуют типы разъёмов для вентиляторов ПК
Конечно, CHA FAN – это только часть истории! На материнских платах есть несколько других разъёмов для вентиляторов, которые служат другим целям.
Вот более пристальный взгляд:
CPU FAN
CPU FAN, как следует из названия, используется для питания и управления кулером вашего процессора.
Кулер ЦП оснащен 4-контактным разъёмом с ШИМ, поэтому подключенный вентилятор можно легко настроить в соответствии с постоянно меняющейся температурой ЦП.
CPU OPT
CPU OPT расшифровывается как CPU Optional и используется для включения дополнительных вентиляторов ЦП. Для тех из вас, кому интересно, есть ли ощутимая разница между CPU FAN и CPU OPT, она есть!
- CPU FAN – это разъём вентилятора по умолчанию для вашего процессора, и если он не подключен (в зависимости от вашей материнской платы), это может даже препятствовать загрузке вашей системы.
- CPU OPT, с другой стороны, служит вторичным разъёмом CPU FAN, но не препятствует загрузке и не выдает никаких сообщений об ошибках.
Следовательно, CPU FAN является обязательным, а CPU OPT – нет (отсюда и название «опциональный»).
SYS FAN
Некоторые производители материнских плат используют метки SYS FAN вместо CHA FAN.
По сути, это одно и то же – они используются для вентиляторов системы / корпуса и бывают 3-контактными или 4-контактными.
Вывод – зачем нужен CHA FAN
Разъёмы CHA FAN, как и разъёмы SYS FAN, отвечают за питание системных и корпусных вентиляторов и обычно имеют 3-контактный или 4-контактный варианты.
Часто задаваемые вопросы
Что такое заголовок CHA FAN?
Разъём CHA FAN, часто называемый разъёмом SYS FAN, представляет собой разъём на материнской плате, используемый для питания и управления вентиляторами системы / корпуса.
Является ли CHA FAN таким же, как SYS FAN?
Да, CHA FAN – это то же самое, что и SYS FAN.
Оба они используются для питания дополнительных вентиляторов, улучшающих воздушный поток вашей системы, и оба они могут быть как 3-контактными, так и 4-контактными.
Является ли CPU FAN таким же, как CPU OPT?
Нет, CPU FAN – это не то же самое, что CPU OPT.
В большинстве систем вам необходимо подключить вентилятор к разъёму CPU FAN, в противном случае ваша система может выдавать вам коды ошибок, а в некоторых случаях может даже не загружаться вообще.
Что касается CPU OPT, это (дополнительный) разъём, предназначенный для питания дополнительных вентиляторов ЦП, которые могут у вас быть. Вы не столкнетесь с какими-либо ошибками, если к этому ничего не подключено.
What Is The Chassis Fan (“CHA_FAN”) Connector? What Are “Chassis” Fans?
Are you thinking about building your own computer? Do you want to customize your existing computer to meet your needs? If so, you are probably thinking about the performance of the computer. You may want to handle gaming, or you may be looking for a powerful computer that you can use to quickly trade stocks on the market.
At the same time, you need to make sure your computer will work well once you are done making your modifications or building it from scratch. That is where case fans can be important. Also called chassis fans, what are these fans, and what do they do? Are they the same as CPU fans? And how do they then plug into the motherboard itself? We answer these questions, and more, below.

Contents hide
What Are Case Fans?
First, a case fan can go by many names. They might also be called chassis fans or system fans. They are located inside the case of the computer itself, which is why they are called case fans.

If you take a look at the front or back of your computer case, you should see a few fans spinning. Alternatively, when you turn on the computer, you may hear something start to spin. You are hearing the case fans doing their jobs.
The video clip below shows the chassis fans too, along with showing the “CPU fan” which I’ll cover later. (Apologies for the bad cable management – this was still a work in progress):

You don’t want the fan to spin too quickly because it might be too loud. On the other hand, if your fan does not spin quickly enough, it might not cool the computer, leading to problems.
Many computer cases come with multiple fans. Then, these fans work in conjunction with heat sinks and computer coolers to keep the computer at an appropriate temperature. If you are taking a look at the case fans, you may want to compare them to your existing heat sink and computer cooler to make sure that everything works well in conjunction with each other.
The fans themselves need to be plugged into a fan connector on your motherboard itself (such as the “CPU_FAN” or “CHA_FAN” connector). Before diving into that topic, let’s quickly cover the difference between CPU fans and chassis fans.
Comparing CPU Fans vs. Chassis Fans
Now, there are multiple fans that have to work together if you want your computer to cool itself properly. The first type of fan is a CPU fan. This is a fan that mounts directly on top of the CPU itself. It is also called your heat sink or CPU cooler, which was mentioned above. The CPU cooler usually has a base that sits directly on top of your CPU:

Usually, it is made out of aluminum, copper, or some sort of metal alloy. Then, the base of its cooler has heat pipes that connect to the individual fins. That is where the fan sits. The heat is sucked up by the heat pipes and moved to the fins on the cooler. Then, the fan on the cooler is responsible for pulling heat directly away from the fins. This air is eventually transported to the case fan where it is ejected by the case or chassis fan.
This is very different from the case fan, which is the fan that is mounted on the inside of the case:

Even though case fans can be mounted in different locations, they are usually called either intake or exhaust fans:
- Your intake fan is designed to take cool air from the external world and suck it into the computer to get it to cool down.
- An outtake fan takes warm air from the inside of the computer and ejects it to the outside world.
There are a few differences between the two fans, even though both are responsible for cooling down your computer.
Chassis fans tend to spin at a single speed, while CPU fans typically adjust their speed depending on the temperature. This is not universal, but it is common and it comes down to how many “pins” the fans have – more on this late.
Chassis fans are mounted directly on the inside of the case, while CPU fans are found on the inside of the system. They then have a wire coming off them, that plugs into the motherboard itself. They also connect to different places on the motherboard – these are called fan connectors:

Even though these fans are labeled “case” fans or “chassis” fans, they can be interchangeable in certain situations.
Can You Put Chassis Fans Into CPU Fan Connectors?

Yes, you are able to take chassis fans and plug them into CPU fan connectors. Keep in mind that this may change how the fan operates, but if you notice that one of your fans is not working as it should, then you might be able to plug it directly into the CPU fan connector. If it doesn’t fit, then don’t force it, but this could be a way for you to effectively cool down your computer.
Since CPU fans tend to change their speed depending on the readings from the CPU, plugging your chassis fan into the CPU fan connector could cause the fan to move up and down in terms of speed, which might be distracting or annoying. The higher the temperature of your computer, the faster the fan will spin, and vice versa. If this isn’t too distracting, then you should be fine.
Can You Plug a CPU Fan Into the Chassis Fan Connector?
You can take your CPU fan and plug it into the chassis fan connector, but remember that the CPU fan typically changes temperature automatically depending on the temperature of your CPU. If you plug your CPU fan into the chassis fan connector, it may no longer be receiving signals from your CPU. Therefore, it will not know whether to spin faster or slower.
If you do not keep an eye on the temperature, the fan might not pull down the CPU enough. Therefore, you may want to see if there is an option to collect temperature signals on your motherboard. Then, you might have to manually adjust the fan speed depending on the temperature of your computer – this can sometimes be done in downloadable software like the ASUS Armory Crate:

If you do not do so, your computer could overheat, which could lead to problems. Even though your computer will technically work if you plug a CPU fan into the chassis, you need to make sure that you are still adequately cooling the rest of the computer.
Comparing 3 Pin and 4 Pin Fan Connectors
As you build your computer, you will also come across 3 pin and 4 pin fan connectors. What are the differences between them?
A 3 Pin Fan
As the name suggests, a 3 pin fan connector has three separate indicators. The first wire is for the power, the second wire is for the ground, and the third wire is for the tachnometric signal, which is the speed sensor. This is the sensor that is responsible for monitoring the speed and performance of your fan.
This speed signal will adjust the power applied to the motor depending on the speed of the fan itself. Therefore, the speed of the fan is controlled by either increasing or reducing the voltage across the power cable. In general, a 3-pin fan is an older style.
A 4 Pin Fan
You may also come across a 4-pin fan. This is more common with modern motherboards. The fourth wire is called the PWM, or the Pulse Width Modulation. This wire controls the power supply and rotation speed of the fan itself.

This fourth wire is absolutely critical in the cooling of your computer. This wire is responsible for adjusting the speed of the fan depending on the temperature of the computer. In general, the longer the voltage is applied to the motor of the fan, the higher the fan will spin. This voltage is directly controlled by the PWM signal.
There are a few other differences to note between the fans as well. They include:
- In general, 3 pin fans are noisier than 4 pin fans. Even though you might notice 4 pin fans more because their speeds might change more often, they are usually not as noisy as 3 pin fans.
- If you have a newer computer that consumes more power, it will probably require 4 pin fans instead of 3 pin fans.
- 4 pin fans usually last much longer than 3pin fans. This is because 4 pin fans will change their speed depending on how much speed is needed to cool the computer. In contrast, 3 pin fans rotate at a high speed almost all the time. This causes them to wear out more quickly.
If you are building your own computer, then you will probably want to go with a 4 pin fans. Even though this can be more expensive than a 3 pin fan, it also works better, last longer, and will more efficiently cool your computer.
A 4 pin fan has an automated controller that will automatically adjust the speed of the fan depending on what is needed to cool the computer. This is not something you will find with a 3 pin fan, which is the biggest difference between the two. If you see “PWM,” you are always looking at a 4 pin fan.
About Tristan Perry
Tristan has been interested in computer hardware and software since he was 10 years old. He has built loads of computers over the years, along with installing, modifying and writing software (he’s a backend software developer ‘by trade’).
Tristan also has an academic background in technology (in Math and Computer Science), so he enjoys drilling into the deeper aspects of technology.
Tristan is also an avid PC gamer, with FFX and Rocket League being his favorite games.
If you have any questions, feedback or suggestions about this article, please leave a comment below. Please note that all comments go into a moderation queue (to prevent blog spam). Your comment will be manually reviewed and approved by Tristan in less than a week. Thanks!
Источник https://webznam.ru/blog/chto_oznachaet_cha_fan/2022-06-29-2083
Источник https://www.techoverwrite.com/chassis-fan-connector-guide/